Step by Step Guide
1. Start Microsoft Office Outlook.
2. Select File from the top menu, under "Info" > "Account Settings" choose E-mail Accounts.
3. Under the tab "Email", click New.
4. Select "E-mail Account" then click Next.
5. Select "Manually configure server settings or additional server types" then click Next.
6. Select "Internet E-mail" then click Next.
7. Under "User Information"
Your Name: [ENTER YOUR FULL NAME]
E-mail Address: [ENTER YOUR FULL EMAIL ADDRESS]
8. Under "Server Information", enter the following:
* Please replace "yourdomain.com" and keep "mail." in front with your actual domain.
For example, if your domain name is abc.com.my, your incoming & outgoing setting below should be mail.abc.com.my
Account Type: POP3 or IMAP
Incoming mail server: mail.yourdomain.com
Outgoing mail server (SMTP): mail.yourdomain.com
9. Under "Logon Information"
User Name: [ENTER YOUR FULL EMAIL ADDRESS]
Password: [ENTER THE PASSWORD OF YOUR EMAIL ACCOUNT]
10. Check "Remember password" if you don't want to enter your password each time.
11. Please Do Not check "Log on using Secure Password Authentication (SPA)".
12. Click on the More Setting button.
13. Click the Outgoing Server tab.
14. Check "My outgoing server (SMTP) requires authentication".
15. Select "Use same settings as my incoming mail server".
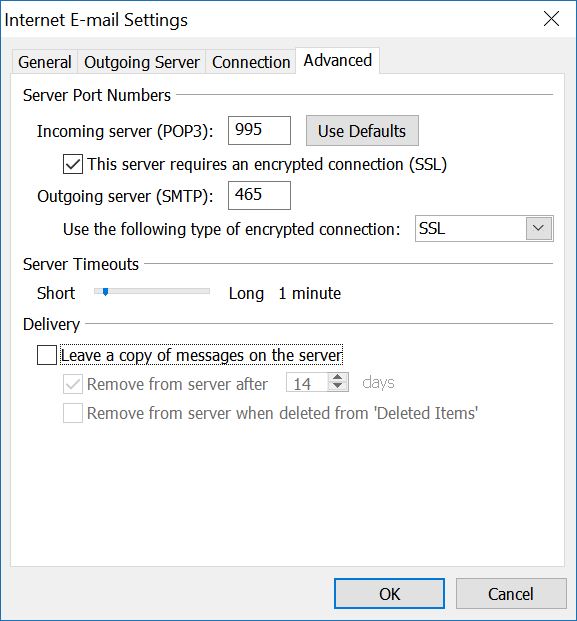
16. Click the Advanced tab.
17. Under "Server Port Numbers".
Incoming server: 995 (POP3) or 993 (IMAP)
This server requires an encrypted connection (SSL): YES
Outgoing server (SMTP): 465
Usee the following type of encrypted connection: SSL
18. Click OK button.
19. Click Next and then Finish.
* For all examples above, please replace "yourdomain.com" with your actual domain.
20. IF you have not created SSL for mail.yourdomain.com then you will received a warning everytime you open up the email application. Click Yes to proceed (Default onexs SSL will be applied).
Note: IMAP will synchronise your email content with the webmail, POP3 will download the email from the server and delete it from the mail server.
Note: You need to create a new email account in the hosting control panel before configure the email in email software